6+ Useful Tips for Internet Explorer Users
And here are 6+ useful tips I found that you may not know you can do in IE. Note that they are not only limited to IE 10. Some of them may apply to other browsers as well. Feel free to try out on both IE and others.
All-in-one address bar
The address bar in IE is not only for typing in web addresses but for searching as well. You don’t have to open Google or Bing page to conduct the search. Instead, you can just type in the keywords and Enter, the search result page will show up automatically for you.And what’s more convenient is that the search bar provides you a list of potential sites in a dropdown list as you type, from history, and the suggestions from the default search engine.

Manage Search Provider
Bing is the default search engine in IE. But if it’s not your thing, you can add another provider by simply clicking Add button shown in the above screenshot. You can manage multiple search providers through Manage Add-ons
Search Providers section. You can change the default Search Provider,
Enable/Disable them, or enable or disable search in Address Bar.
Reopen Last Session
Reopening
last session is to reopen all closed tabs from last time you used IE.
It’s extremely useful and life saver when IE suddenly decided to crash
and to restart on its own. You can simply bring all websites back by
clicking Reopen last session at the bottom of the Tab Preview (we will get onto Tab Preview in a minute).You can even turn Reopen Last Session by default so that when IE starts it automatically brings back all websites you were previously visiting. And you can do so by clicking the Gear icon, go to Internet Options, and select Start with tabs from the last session option under Startup.

Reopen closed tabs
It’s
equally useful that you can reopen the tabs you accidently closed with
only a couple clicks. You can right-click the tab and either reopen all
closed tabs there or reopen single closed tabs recently closed. You can
also do so from the Tab Preview as well.
Tab Preview page is your friend
The
Tab Preview page contains 10 most frequently sites you accessed in the
past, as well as 3 more options that let you discover other sites you
might like, such as- Reopen closed tabs
- Reopen last session
- InPrivate Browsing

You can even set it as your default home page so the Tab Preview shows up every time when you open Internet Explorer. You can do so by adding “about:tabs” to the Home Page setting in Internet Options.

Efficiently use keyboard and mouse to operate Tabs
Here are a few my favorite keyboard and mouse tricks that will help you easily jump between the tabs in IE, if you hadn’t known.Open new tab: Ctrl + T
Close the active tab: Ctrl + W or Ctrl + F4, or middle mouse click on the tab.
Open InPrivate Browsing: Ctrl + Shift + P, which is different from Chrome.
Open link in new tab: middle mouse click the link.
Go one page back: press Backspace
Go one page forward: Shift + Backspace
[updated on Nov. 16, 2012]
Reopen last closed tab: Ctrl + Shift + TCycle through tabs: Ctrl + Tab
Thanks to the tip, Tipper.
Source: http://www.nextofwindows.com/6-useful-tips-for-internet-explorer-users/
6 Ways to speed up Internet Explorer 10
IE10 is the default browser in Windows 8. This new version has some new features and is already quite snappy. But us netbook users want to squeeze the last drop of performance out of their system. (By the way, did you already try to speed up Windows 8 itself?) I’ve summed up a few tips & tweaks you can do to make your IE even faster:
Change your IE10 Home page to a blank page:

By default Internet Explorer will load the MSN page, which features news, weather and other info. Loading this page takes time and bandwidth, you can easily skip this by changing your default homepage.
- Open internet explorer from your desktop
- Click on the tool-icon (Or press Alt-X)
- Select Internet Options
- In the ‘Home Page’ section, click on the ‘use blank’ button.
- Click OK
Your browser will now startup with an empty page.
Disable unneeded IE10 add-ons:

Internet Explorer Add-ons may be useful for some tasks but not for all. If the add-ons are enabled, they can slow down the loading websites, even when they are not needed.
- Open internet explorer from your desktop
- Click on the tool-icon (Or press Alt-X)
- Select ‘Manage Add-ons’
- Now select all the unnecessary add-ons and disable them.
Turn on your IE10 pop-up blocker:
Quite simple: Popups use bandwidth and processing power, so we want to disable them:1. Open Internet Explorer.
2. Press Alt-X or click on the tool icon.
3. Select Internet Options and Select Privacy
4. Tick (check) the pop-up blocker and click Apply.
Disable your LAN autodetect:

Autodetecting your LAN (Local Area Network) is a feature from the good-old dial-up modem times, it checks if there is a broadband connection available, and sees is if it can be used for internet access. Since almost all connection (wired and wireless) are broadband nowadays, this is a feature we can switch of to save some time.
1. Open Internet Explorer.
2. Click on the tool-icon (Or press Alt-X)
3. Select Internet Options.
4. Select Connections.
5. Select Lan Settings.
6. Reverse the autodetect setting and click apply.
Change IE10 Temporary Internet files settings:

Temporary Internet Files can save bandwidth and loading-times. But if this folder gets too big it will do the opposite, you’d like to keep your browsing cache ‘lean and mean’
- Open Internet Explorer.
- Go to Tools (alt-X) and choose ‘Internet Options’.
- Under ‘browsing history’ click ‘settings’
- Enter ’50′ In the ‘Disk space to use’ field to limit the website data disk use to 50 MB
- Click OK twice to save the setting.
Increase MaxConnections Registry setting:
Adding an MaxConnections setting to your registry will allow Internet Explorer to simultaneously download multiple files at once, reducing the time it takes to load a website.Warning: this tweak needs adding a key to your computers’ registry, an advanced method to alter system settings, only perform this change if you have experience with changing the registry.
- Press the Window Button + R and enter ‘regedit’ and press enter.
- Expand HKEY_CURRENT_USER.
- Expand the Software folder.
- Expand the Microsoft folder.
- Expand the Windows folder.
- Expand the CurrentVersion folder.
- Right click the folder ‘Internet Settings’.
- Click New and then ‘DWORD (32-bit) Value’.
- You will then be redirected to a screen that shows that you’ve created a new file with the default name ‘New Value #1′.
- Rename it to “MaxConnectionsPer1_0Server”. (Copy and paste this phrase to guarantee that there are no errors.)
- Double click MaxConnectionsPer1_0Server and the edit screen will appear.
- Select the Decimal radiobox
- type in 10 in the ‘Value data’ box and click OK.
- Restart your PC to enable this setting
Source: http://www.windows8netbook.com/6-ways-to-speed-up-internet-explorer-10/
Where is Compatibility View in IE 11, And How To Use It?
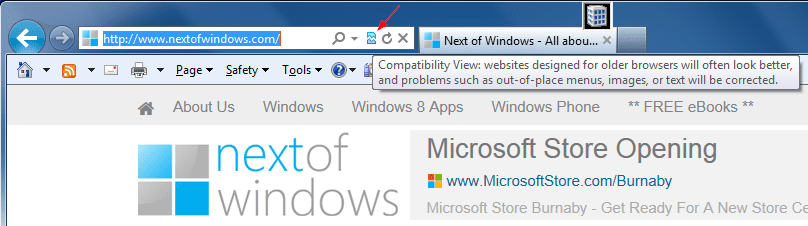
Compatibility View Button in IE 10

No Compatibility View Button in IE 11
So, why it’s removed in IE 11?
According to this Microsoft Technet document,the Compatibility View button would attempt to fix a broken standards-based website, by getting the page to appear like it did in Internet Explorer 7. Today however, more standards-based websites are broken by attempting to appear like they did in Internet Explorer 7. So instead of implementing and using Compatibility View, developers are updating their server configuration to add X-UA-Compatible meta tags, which forces the content to the “edge”, making the Compatibility View button disappear. In support of these changes, the Compatibility View button has been completely removed for Internet Explorer 11.
And here is what you can do, if you still want it
While a site is up, click on the Gear icon at the top right corner of your IE window and choose Compatibility View settings.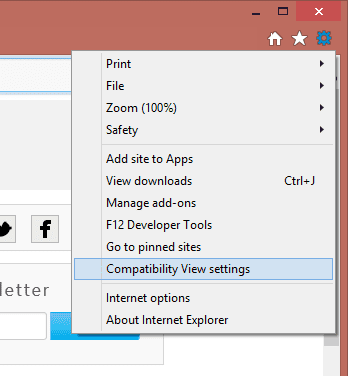
And click OK to add the domain name into the website list that IE will be turning on Compatibility View automatically for you.
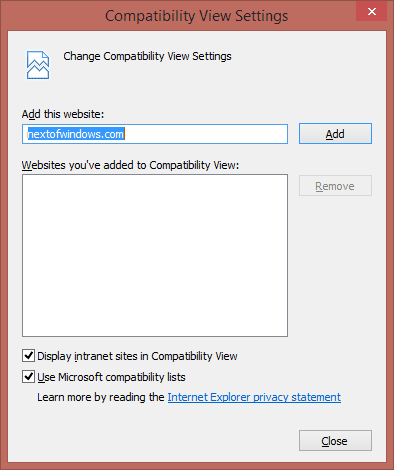
I have to admit that it’s cumbersome to use but unfortunately that’s the only way that turns a site in compatibility view in IE 11.
Source: http://www.nextofwindows.com/where-is-compatibility-view-in-ie-11-and-how-to-use-it/
10 Tips to Speed Up, Optimize & Boost Internet Explorer 8, IE7 and IE6 Performance
Version 0.512
DISCLAIMER
Proceed at your own risk! The information here is accurate to the best of my knowledge. I will not be held responsible if this document causes your computer to explode or burst into flames. In real serious terms, if any corruption of data, hardware damage or any other kind of damage/losses/etc. arises from the use of this document, I will not be responsible for it. If you don't like this, please don't read any further.
1. Disable Unneeded Add-ons
This is the Number 1 culprit in slowing down your browser. To get an idea of the speed boost you can get, go to Start > Programs > Accessories > System Tools > Internet Explorer (No Add-ons).
How Much Speed Are We Talking?
You will now see Internet Explorer start without any add-ons or toolbars. The speed of how the browser starts now may have startled you.
Try out the browser now. Very much faster? Now you realize how those pesky add-ons have been slowing down your browsing experience. However, in this mode, you won't be able to watch YouTube videos as the Flash add-on is also disabled. We will fix this now.
Close the browser and start the browser as normal. In the browser, go to http://www.google.com. Next, we need to go to Manage Add-ons
- For IE8 and IE6, go to Internet Explorer > Tools > Manage Add-Ons.
- For IE7, go to Internet Explorer > Tools > Manage Add-Ons.> Enable or Disable Add-ons
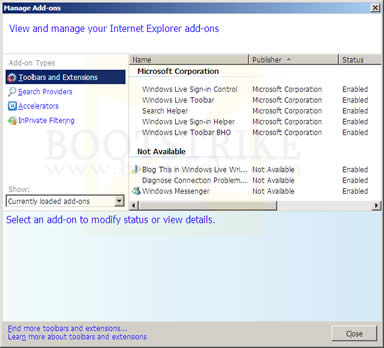
You will now get the Manage Add-ons window
This is how Manage Add-ons looks like in IE8. The difference between earlier versions is that they have some additional functionality missing, but the main functions we need are there.
Manage Add-ons window in IE8
Make sure under 'Show:', only 'Add-ons currently loaded' is selected
Now you have a list of add-ons that are currently loaded. What you need to do now is to disable all add-ons that you don't need. So now you ask, how to disable an add-on?
- For IE8, under "Show:", "Currently loaded add-ons" should be selected
- For IE6 and IE7, under "Show:", "Add-ons currently loaded in Internet Explorer" should be selected
Here is a table of some commonly known add-ons that you can disable. The value in square brackets [ ] indicate my personal opinion of whether it should be disabled.
- For IE8, click the add-on on the right column, and click the Disable button at the bottom.
- For IE6 and IE7, click the add-on and at the Settings box at the bottom, click Disable.
Almost all of the add-ons can be disabled as they are not used.
Add-on Name Purpose Can Be Disabled? 1 Adobe PDF Link Helper Open PDF documents in the same IE8 window without opening Adobe Reader Yes, unless you prefer reading PDFs within Internet Explorer's window. PDFs will still open in Adobe Reader when this add-on is disabled [DISABLE] 2 Research Adds additional links to the menu bar Yes [DISABLE] 3 Diagnose Connection Problems... Helps you to diagnose connection problem whenever there is a problem connecting to the Internet Yes, enable it when needed [DISABLE] 4 Java(tm) Plug-In SSV Helper
Java(tm) Plug-In 2 SSV HelperTo display Java content Depends. If the sites you visit require Java (e.g. Internet Banking sites), then you have to leave this on. If not, disable it [ENABLE] 5 Windows Live Toolbar / Windows Live Sign-in Helper / Windows Live Toolbar BHO / Search Helper Windows Live Toolbar Disable if you don't use the Live! Toolbars. Windows Live software will still function normally [DISABLE] 6 Windows Messenger Helps you to sign in to Hotmail or other Passport sites automatically if you are already signed in Yes [DISABLE] 7 Blog This with Windows Live Writer Gives shortcuts to post the current webpage content and title quickly to your blog Enable it only if you use this function. Otherwise disable. [DISABLE] 8 Shockwave Flash Object Allows playing of embedded Flash videos at webpages such as YouTube Do not disable. [ENABLE]
2. Disable Automatic Configuration
Some PCs have this set for some reason, slowing down every time you open the browser. If you in a work environment, do not use this tweak as it may cause your Internet not to work.
To disable this, go to Start > Control Panel > Internet Options > Connections > LAN Settings. Uncheck all the boxes under Automatic Configuration.
3. Increase the Max Connections Per Server
Internet Explorer 7 and below are limited to two connections per server. This is why you can only download a maximum of two files from one website. Internet Explorer 8 raises this limit to 6.
Here is how to increase the number of HTTP simultaneous connections to 10. By having 10 connections, IE will be able to download 10 different files at one time. This will make web pages load faster.
If you are using Internet Explorer 7 and below
If you are using Internet Explorer 8
- Go to Start > Run
- Enter "regedit" and hit ENTER
- On the left, navigate to the following HKEY_CURRENT_USER\Software\Microsoft\Windows\CurrentVersion\Internet Settings folder by:
- Click HKEY_CURRENT_USER, then
- Software, then
- Microsoft, then
- Windows, then
- CurrentVersion, then
- Internet Settings
- Internet Settings should be selected on the left column
- Go to Edit > New > DWORD Value
- A box should appear. Put the name as "MaxConnectionsPer1_0Server", without double quotes. Press Enter.
- Double click the entry you just created, select Base as "Decimal" and type 10 under Value data
- Go to Edit > New > DWORD Value
- A box should appear. Put the name as "MaxConnectionsPerServer", without double quotes. Press Enter.
- Double click the entry you just created, select Base as "Decimal" and type 10 under Value data
- Close Registry Editor
- Restart your system
- Go to Start > Run
- Enter "regedit" and hit ENTER
- On the left, navigate to the following HKEY_LOCAL_MACHINE\SOFTWARE\Microsoft\Internet Explorer\MAIN\FeatureControl\FEATURE_MAXCONNECTIONSPERSERVER folder by:
- Click HKEY_LOCAL_MACHINE, then
- SOFTWARE, then
- Microsoft, then
- Internet Explorer, then
- MAIN, then
- FeatureControl, then
- FEATURE_MAXCONNECTIONSPERSERVER
- FEATURE_MAXCONNECTIONSPERSERVER should be selected on the left column
- Go to Edit > New > DWORD Value
- A box should appear. Put the name as "iexplore.exe", without double quotes. Press Enter.
- Double click the entry you just created, select Base as "Decimal" and type 10 under Value data
- On the left, click on FEATURE_MAXCONNECTIONSPER1_0SERVER, which is just near to the one already selected
- Go to Edit > New > DWORD Value
- A box should appear. Put the name as "iexplore.exe", without double quotes. Press Enter.
- Double click the entry you just created, select Base as "Decimal" and type 10 under Value data
- Close Registry Editor
- Restart your system and the changes should take effect
4. Use a HOSTS file (Advanced)
Firefox has AdBlock Plus. Internet Explorer? HOSTS file.
Unfortunately, the Hosts file method is not as straight forward as Adblock Plus. For one, it blocks websites at a domain level. Next, removing an entry from the file requires you to go through some technical steps.
But once you get it working, you realize the speed benefits. Sites load faster. Here's how to install HostsMan, a free software that helps to manage the HOSTS file.
If you ever need to remove a site from the filter list
- Go to http://www.abelhadigital.com/
- Click HostsMan on the top
- Under "Download (Installer version)" header, click a download link under "Download from:"
- When your browser prompts you what to do with the ZIP file, click OPEN
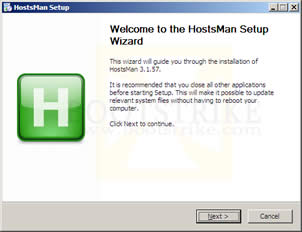
- There should be a single file named HostsMan_Setup.exe. Double click it to install the manager
First Setup screen of HostsMan- Click Next in the following dialog boxes to install HostsMan
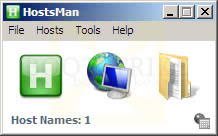
- After installation, the following interface appears:
HostsMan Main Interface- Click on the button in the middle to download the latest filter list
- On the box that appears, click Update. If HostsMan asks whether to update the Hosts file, click Update.
- Once you are done, you can close HostsMan. HostsMan does not need to be running.
See what I mean when I said removing an entry is not easy?
- Start HostsMan (Start > Programs > HostsMan > HostsMan)
- Click the third button
- Click Find in the top toolbar
- Type the site name without the http://
- The table at the top of the window will be highlighted with the matching row.
- Check the box in the second column for that row
- Click Save on the toolbar
- Close the window and HostsMan
- Restart the browser
When a site is blocked, visiting it directly in Internet Explorer 8 will pass it as a search query to your default search engine (Bing.com by default) thus potentially slowing down the page loading. Here's how to handle localhost requests internally, speeding up browsing
Now when you visit a blocked site directly, the message "Blocked: (domain name)" will be shown instead. Page loading times will now have a significant improvement.
- Start HostsServer (Start > Programs > HostsMan > HostsServer)
- Tools > HostsServer > Control Panel
- Click on 'Start Server'. The Server Status should now be 'Running'
- Click on Options
- Check the box 'Start HostsServer automatically'
- Uncheck the box 'Enable Log'
- Click Apply
- Close
5. Increase the Half-Open Connection Limit (Advanced)
Windows XP SP2 and above limits the number of half-open connections to 10. This is not a big issue, and increasing the limit yields little benefits.
To increase the limit, there are two freely available patchers:
Lvllord Patch - ONLY for Windows XP Users (NOT Vista/Windows 7 users, see next step for Vista users)
UPDATE: There has been a recent Automatic Update (MS08-001) released on January 8 2008 that addresses some network security concerns.The below has NOT been tested with the latest TCPIP.SYS (v5.0.2195.7147) file.Update:The patch has been tested with KB941644 (an automatic update) and works perfectly!
To reset the max half open connections, run the lvllord utility again (for XP) and type 'U' to uninstall.
- Go to this site - http://www.lvllord.de/
- Click on Downloads.
- Right-click the link and click "Save Target As".
- Save it in your Desktop.
- Open the file and run the program located inside the archive, agreeing to the security warning.
- Some text should scroll by in a MS-DOS window, after it ends, type C.
- Enter 100 for the number of concurrent half-open connections and press Enter.
- Type Y and the file should be patched. Cancel any Windows XP warnings that should appear, it is part of Microsoft's way of ensuring its files are not tampered with (the utility tampers with them on purpose to change the limit).
Half-Open Patch - For Windows VISTA / Windows XP (NOT required for Windows 7)
This patcher works for both 32 and 64 bit Vista and XP versions.
NOTE: The patchers above are known to trigger anti-virus alerts. Ignore them. The alerts are triggered due to the patcher making changes to the way Windows works hence making the anti-virus software suspicious.
- Go to this site - http://half-open.com/download_en.htm.
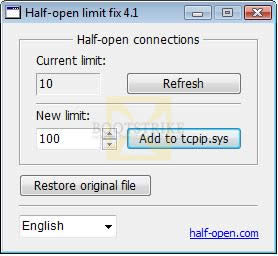
- Download the EXE file in the link titled Half-open limit fix 4.1 (as of Feb 2010)
- Open the folder where you saved the file and run the file you downloaded
- Under 'New value', set it to 100 (if it is not already set)
Set the new value to 100- Click 'Add to tcpip.sys'
- Click OK.
- Click OK again. Cancel any Windows warnings that may appear, it is part of Microsoft's way of ensuring its files are not tampered with (the utility tampers with them on purpose to change the limit).
- Restart your computer.
- If something is not working right (e.g. Internet access does not work anymore) and you want to undo the changes, run the software again and click "Restore original file".
6. Disable JavaScript and ActiveX (Advanced)
This tip can improve web page loading speed by up to 300% or even more. However, some sites may not work properly or even refuse to load. For example, Twitter will refuse to load with JavaScript disabled. Youtube videos will not work as well with Javascript disabled.
To disable JavaScript, start Internet Explorer and go to Tools > Internet Options > Security > Custom Level > Active Scripting and set it to 'Disable'.
To disable ActiveX, set 'Run ActiveX Controls and plug-ins' at the same window to 'Disable'. This automatically disables Flash as well.
7. Re-register actxprxy.dll (IE8 only)
It has been widely speculated in the web that running the following 'tweak' improves IE8 speed considerably. In actual fact, what it does is fix some holes left by installation processes.
Regardless, there is no bad side effects to this command. Close all IE8 browser windows. Go to Start > Run and enter the command
and press Enter. You should get a 'DllRegisterServer in actxprxy.dll succeeded' message.regsvr32 actxprxy.dll
8. Clear Temporary Files
Few people remember to do this. Eventually, the hard drive ends up with years of data that was downloaded from the Internet.
For Internet Explorer 6
For Internet Explorer 7 and above
- Go to Start > Control Panel > Internet Options
- Click Delete Files
- Click OK
Depending on the amount of data, this process can take some time.
- Go to Start > Control Panel > Internet Options
- Click Delete...
- Click Delete Files
- Click Yes
8. Clean Up and Defrag Your Hard Drive
Defragging can improve performance in many software programs, not only Internet Explorer. It is best done after cleaning up your hard drive with a free utility such as CCleaner which we will do below.
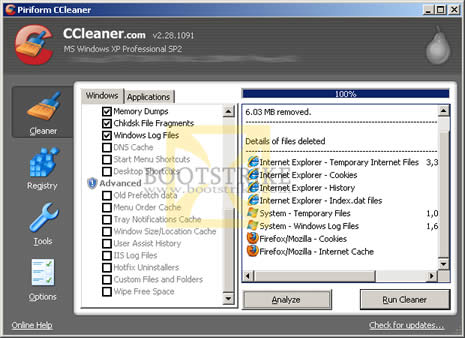
First, lets do a clean up of your hard drive to get rid of all temporary files using a free efficient program named CCleaner.
CCleaner will now run and delete all the left over temporary files. You may see stuff like Recent documents shortcuts and IE URL drop down empty. This is normal.
- Go to the CCleaner download website - here is a direct link
- Click the link 'Download now'
- Run and install the software (remember to uncheck CCleaner Yahoo! Toolbar if you don't need it - it is NOT required and is checked by default)
- Run CCleaner
CCleaner main interface- By default, CCleaner erases Internet Explorer History and Cookies as well. If you don't want to delete these, uncheck the relevant boxes in the left column under Internet Explorer.
- Click Run Cleaner
- Click OK. Don't worry, only temporary files are deleted.
Now lets run Disk Defragmenter
This will take some time depending on how badly fragmented the drive is. For best results, close all programs before clicking the Defragment button.
- Go to Start > Programs > Accessories > System Tools
- Click Disk Defragmenter
- Click Defragment
9. Remove list of Restricted Sites
Some security software (such as Spybot - source) insert large lists of site addresses in Internet Explorer's Restricted Sites feature. This can slow down IE as it will need to verify the access permissions for every site it pulls data from.
WARNING: Following the tip below will clear all malicious site addresses inserted by your security software. With such entries, IE will restrict on what such sites can do IF you visit them. Without these entries, IE will treat these sites as normal sites. This does not mean that your computer is now more open to security vulnerabilities. As long as you keep Windows and Internet Explorer updated, you reduce the chances of getting compromised..
Personally, we would remove such lists as they can slow down the Internet Explorer browsing experience.
To clear such lists
- Go to http://www.mvps.org/winhelp2002/restricted.htm
- Download and save the DelDomains.inf file into your Desktop
- Go to your Desktop, right-click the file and click Install
- Nothing will happen - this is normal
10. Optimize Your Internet Connection
Optimize your TCP settings. Speedguide.net provides free utilities to make this step as easy as cake. We also have a mirror of the file.Last Updated 10th September 2010 Source: http://bootstrike.com/Articles/SpeedUpIE/
Optimize TCP settings for Windows XP, Vista and Windows 7
TCP Optimizer Main Window
Steps to optimize your internet connection.
This would have optimized your settings according to your internet connection you have. If you need to undo the changes TCP Optimizer made, open TCP Optimizer > File > Restore Backup Settings.
- First, download and extract the files to any folder.
- Double-click on the TCPOptimizer application in the folder to launch it
- At the bottom of the window, click "Optimal"
- At the top of the window, drag the slider to select your connection speed. If you are not sure, run the speed test. Use the value that you get for the Download field (which is in kb/s) and set the slider to it.
- If you are using ADSL, check with your Internet Service Provider whether it is based on PPPoE or PPPoA. You may also be able to obtain the information via your router's homepage. If your connection is based on PPPoE, tick the PPPoE box.
- Under the "Network Adapter selection" box, select the network adapter you use to connect to the Internet. If you are unsure, go to Start > Control Panel > Network Connections. Your connection should be listed there. Most of the time, it is Local Area Connection. Select the entry and the status bar at the bottom should display the network adapter name.
- Click 'Apply Changes' at the bottom of the window.
- Ensure that 'Backup' is checked and click OK at the next confirmation box that appears.
- Once the changes are done, reboot your system